Most homes do not have many doorways that are wide enough for people who wish to safely Age-in-Place or for those with mobility issues. This post will focus on how to widen existing doorways, whether you want a simple solution such as switching the direction of the swing of the door, widening the frame or using an alternative door style. Regardless, the focus here is to widen a doorway enough to improve accessibility, safety and independence for those people wishing to age in place or provide better access for visitors who may need mobility assistance.

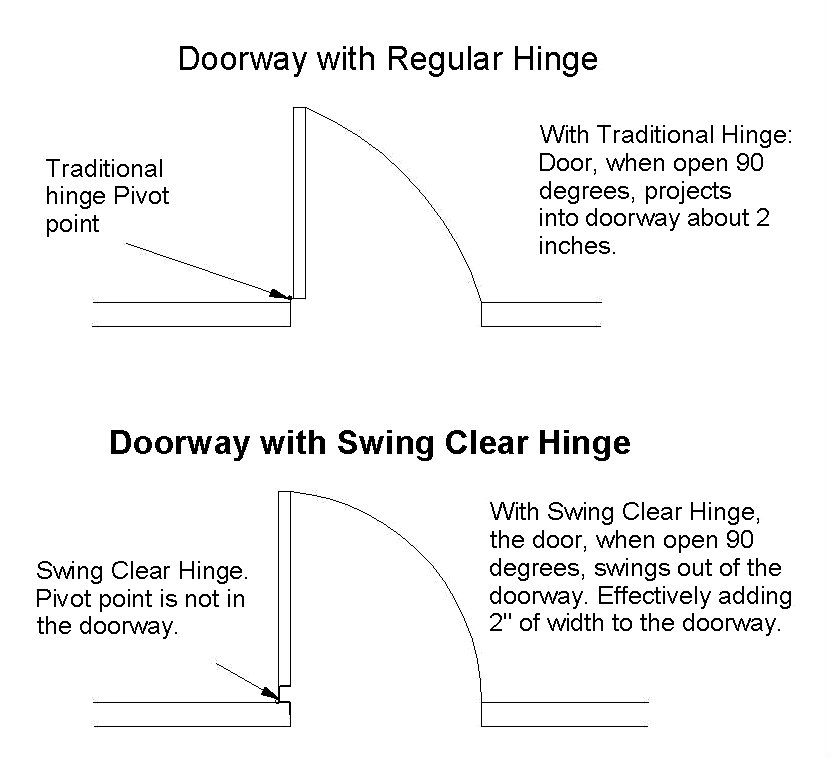
Let’s start with three easy ways to widen existing doorways. First, when a door is open 90 degrees, the door plus hinge swing takes up about 2″ of the doorway – in other words the doorway could be more accessible (by 2″) if we can just get the door out of the way. The easy solution is to remove the existing doors’ hinges and replace them with “Swing Clear Hinges”. “Swing Clear Hinges” move the pivot point of the hinge from the edge of the doorway to about 2″ out of the doorway. So now when the door opens 90 degrees, the doorway is not restricted by the thickness of the door. Typically, the only tool needed is a Phillips-head screwdriver.
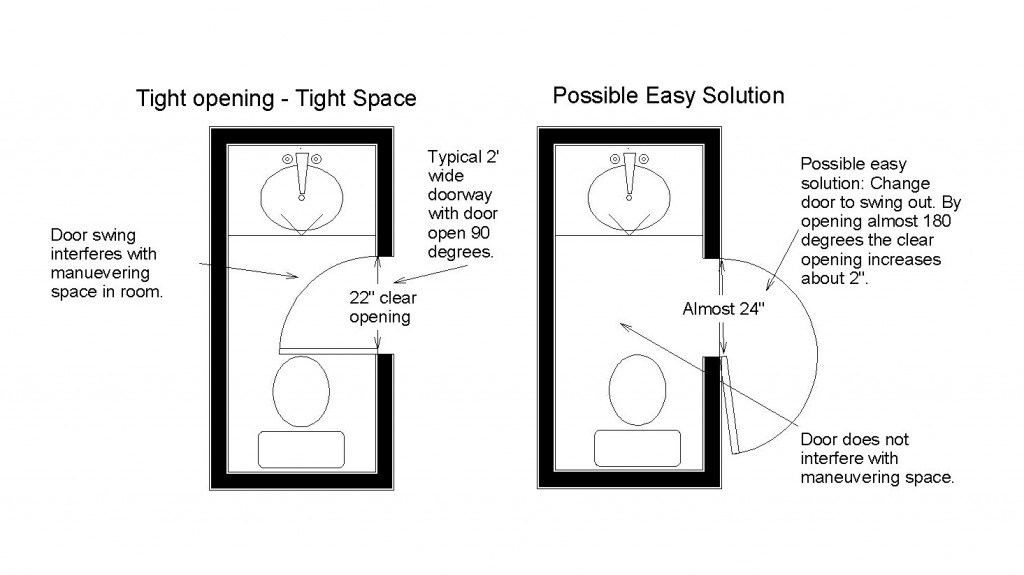
A second option to create a wider doorway is by reversing the swing of a door. In this scenario, I am assuming that the suspect door will not open more than 90 degrees – therefore, the door itself is restricting the size of the doorway. The idea here is to remove the door and frame and then re-install the door and frame in the same opening, but in a way that the door will swing a different direction and open 180 degrees. By opening 180 degrees, the door will no longer be an obstacle as it was when the door would only open 90 degrees. So, really all we have done in this solution, (as in the swing clear hinge solution above) is increase the USEABLE space of the doorway.

Thirdly, this next solution to widen existing doorways is a slightly more complex, yet still doable. In this example, I am assuming that to have a door is not completely necessary. Maybe this is a door to a hallway or large master bedroom closet. In this scenario, one would remove the door, door frame and trim. The doorway would then be finished as a trimmed opening. This idea could yield an opening 1-4 inches more accessible depending on how much the door interfered with passage through the doorway, and how large of a gap there is between the existing door frame and wall framing.
Unintended consequence: Most finish flooring does NOT extend under door frames. Therefore when the finished doorway is widened, as in this example, a gap in the finished flooring will exist when the widening is complete.
Now that we have some relatively easy solutions to widening existing doorways, let’s talk about some more complex solutions. Forewarning: when solutions are more complex, they tend to be more difficult and costly on the homeowner. The following should only be performed by people who are very knowledgeable and familiar with framing carpentry.

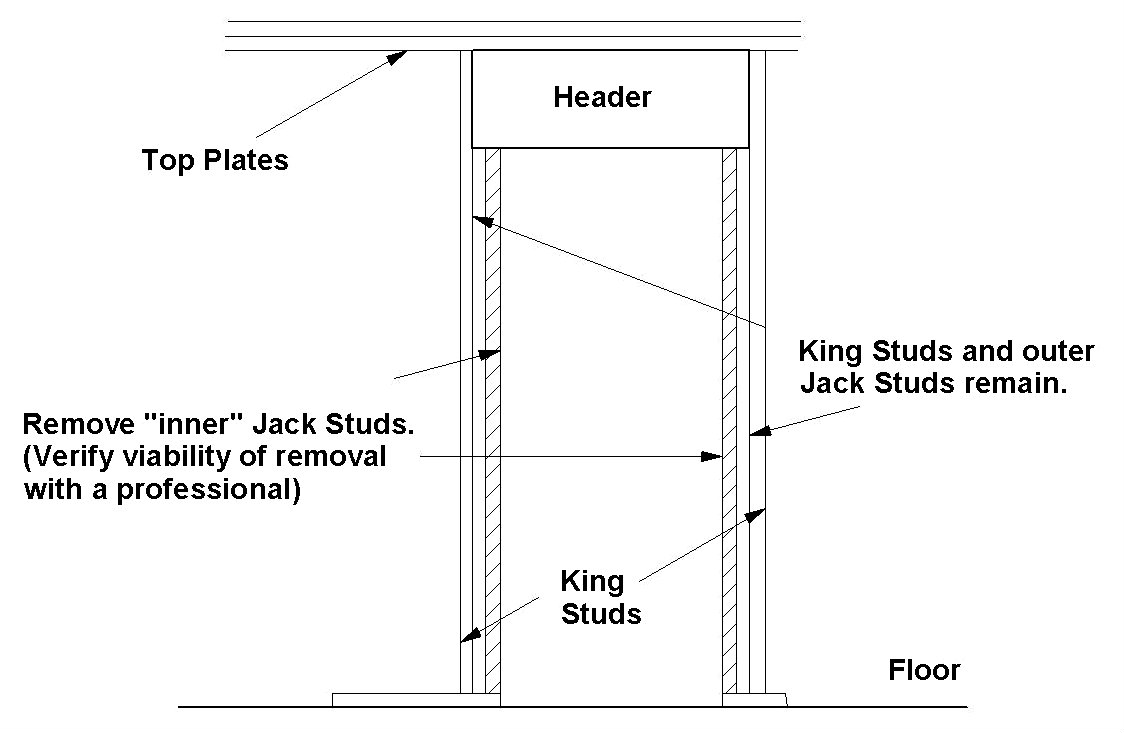
Let’s start first by assuming we need to widen the entire doorway no more than 2 to 3 inches and that we are not going to change the doorway header. One possible solution is to remove the door and frame. Cut away a small strip of drywall on both sides of the doorway to expose the framing on both sides of the doorway at the top of the doorway opening. We are looking to see if there are two Jack studs on each side supporting the header above. Admittedly, this is a rare occurrence, but why not try to get lucky first? If there are two Jack studs on each side, then one Jack stud may be removed from each side.
Next, determine that removal of one Jack stud from each side is safe. How do we determine if is safe? Well unless you are very knowledgeable about load path, it is best to enlist the services of a building professional or engineer. So, if all works out with your building professional, you can remove the extra Jack and all that is needed is to install a new wider door to gain 2 inches or apply casing and jamb (finish trim) in the opening the opening to gain 3 inches. Oh – then you need to maybe patch drywall, caulk, prime, paint and repair any gaps in the finish flooring created by the wider opening.
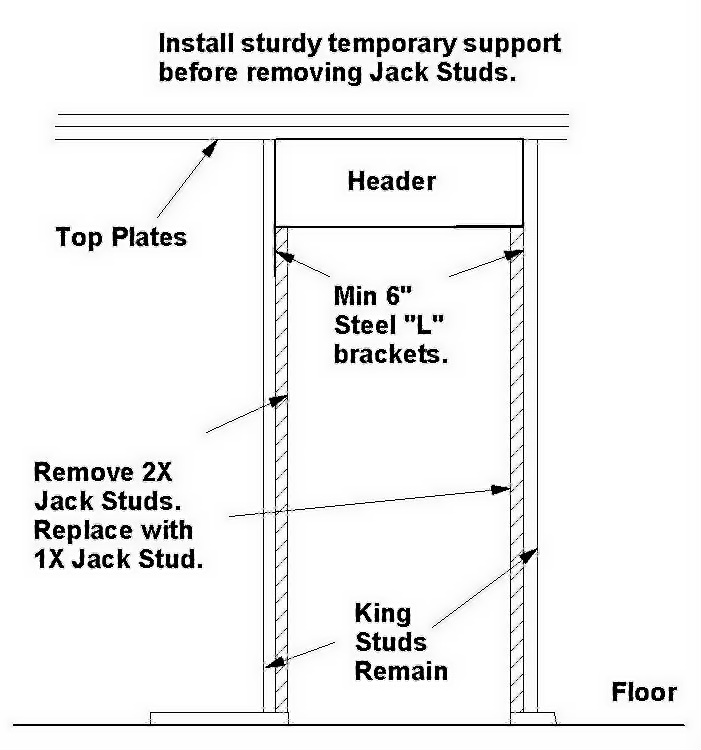
A more likely scenario is that the doorway needing to be widened will have only one Jack stud under each end of the header. In this instance, the existing doorway can still be widened without changing the header or moving the King studs. Our first option is to change the 2x Jack studs to 1X Jacks. This can widen a doorway about 1 1/2 inches.
Here’s how this is done:

First remove the doorway casing and/or door with frame. Next install temporary 2×4 support posts under the header. Remove the Jack studs one at a time. Install a heavy-duty “L” bracket on to the King stud and under the header (chisel the “L” bracket in flush with the King stud and header). Next install a 1X (nice grade) or 3/4 plywood Jack in place of the 2X. It is important to complete the “L” bracket and Jack installation on one side before moving to the other side. Remove the temporary support and case the opening. If you want to add a door you can, however, the door will need to be trimmed to fit the opening.
One final complex option similar to the above is to widen the opening using “Header Hangers.” Most of the big structural hardware-fastener companies make these – USP and Simpson Strong Tie make one called model #HH44. (I am not endorsing either manufacturer.) Make sure you only use the Header Hanger as directed by the manufacturer. The technique here is similar to above. Remove the doorway jambs and trim. Temporarily support the header. Remove the Jack studs one at a time while replacing the Jack studs with the appropriate size header hanger. Finish by installing a finished wood jamb and casing.

If none of the above solutions will satisfy your doorway width requirements for aging in place, then the next solution is to enlarge the opening by replacing the doorway header with a wider header therefore allowing a wider doorway. When widening an existing doorway beyond the width of the header and King studs, it is critical to investigate what may interfere with widening the doorway. Electrical switches, plumbing pipes, HVAC ducts, phone wires or support posts are some of the likely building components that may require relocation to widen the doorway. To be absolutely sure of what you are up against, cut open the drywall on both sides of the opening before committing to widening the doorway. Also, it is very important to determine if the new wider door will hinder you as you approach the doorway. When widening a doorway by moving the King and Jack studs it is critical to position new blocking under the subfloor beneath the King & Jack studs to provide a solid load path.
A final alternative to making the doorway more accessible could be changing the door style itself. Whenever I speak to people about widening doorways or doorway accessibility, the discussion often goes to alternative doors or non-traditional hinge doors. Alternative doors quite honestly have limited use in aging in place remodeling. Yet there are still some instances in which a different style door may be appropriate. Here are some alternatives to the traditional hinge door: Bi-fold door, quad-fold door, double swing door, by-pass doors and pocket doors.
Bi-fold and quad-fold door – These doors are almost never used in aging in place because they reduce the useable doorway width, which impedes accessibility.
Double swing doors – Some people call these “French” doors. Double swing doors are two doors in the same opening where each door is hinged on opposite jambs. Generally double swing doors are used in large openings of four feet or wider. They are a good alternative when you need privacy between rooms and the opening is four feet or wider. Double doors are not as desirable alternative door when the opening is less than four feet.
Bypass doors – These are a good option for closets, but not interior doorways. Bypass doors provide half of the access that double swing doors provide. However bypass doors do not take up any floor space for swing so are a good alternative in a tight space where a hinged door or double door would take swing space.
Pocket doors – Doors that slide into a “pocket” in a wall. Remodeling to install a pocket door as an accessible alternative can be challenging and possibly expensive. Installing a pocket door often involves a structural change to the house, drywall work, relocating some amount of electric work and sometimes relocating plumbing pipes or duct work. Pocket doors, because they slide out of the way, have an initial appeal to accessibility. However, since this blog is talking about aging in place and accessibility, I am going to caution against the use of pocket doors. The biggest drawback for aging in place use is that the little latch to close a pocket door is recessed into the edge of the door. As people age this latch would likely become more difficult to see and use because of loss of dexterity.
Barn door hardware – Barn door style hardware is pretty trendy now. The hardware comes in many styles from rustic metal to sleek modern stainless steel. Pretty much any style door slab can be hung on barn door hardware so you should have no problem matching your home, or pick something unique for fun. These doors operate by hanging from wall mounted hardware and they slide/roll in front of a doorway and then in front of the wall directly adjacent the doorway. They don’t provide maximum privacy and they can be difficult to operate when there are dexterity difficulties or while using walking assistance. But they can give you maximum clearance with style.
As always, feel free to leave a comment or question. I’ll answer it as best I can.
